How to Import Trades with Custom Upload
Updated: June 10, 2026
Custom Upload is designed for broker exports that do not have a dedicated FxJournalStats importer yet. If your broker, prop firm, simulator, or backtesting tool can export trades as CSV or XLSX, you can map the file columns to FxJournalStats trade fields and import your trading history.
AI-assisted mapping makes this faster: upload your file, click Auto-map with AI, review the suggested fields, then apply the mapping before upload.
What Custom Upload Supports #
Custom Upload currently supports:
- CSV files with a header row.
- XLSX/XLS files where the first non-empty row contains column headers.
- Manual column mapping for full control.
- AI-assisted column mapping for faster setup.
- Saved mappings for repeat uploads with the same column structure.
This means you can import data from many sources, as long as your file includes the required trade fields.
When to Use a Dedicated Importer Instead #
If your file looks like an export from a platform FxJournalStats already supports, such as TradingView, Tradovate, Match Trader, cTrader, or FxReplay, Custom Upload may suggest using that dedicated importer instead.
Dedicated importers are recommended when available because they can handle platform-specific formatting, special columns, timestamps, partial closes, and other quirks that generic column mapping may not capture perfectly.
You can still continue with Custom Upload if your file has been modified, comes from a different reporting tool, or you prefer to map the columns manually.
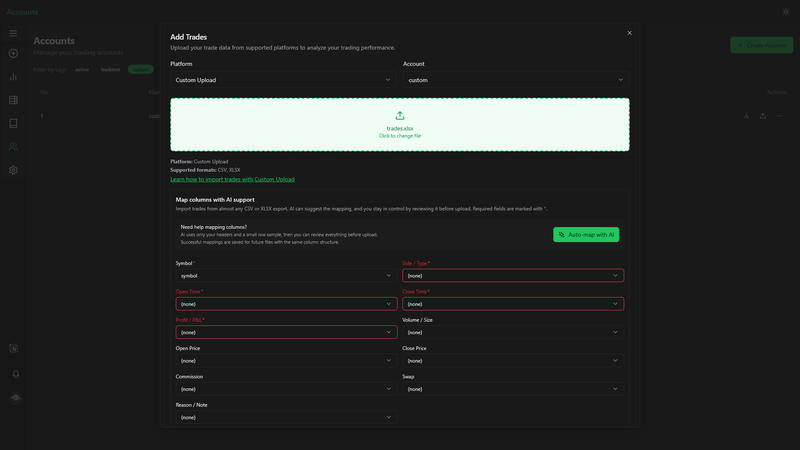
Required Fields #
To create valid trades, your file needs columns for:
- Symbol: the traded market, pair, ticker, or instrument.
- Side / Type: buy, sell, long, short, or similar.
- Open Time: when the trade opened.
- Close Time: when the trade closed.
- Profit / P&L: the result of the trade.
Optional fields include volume, open price, close price, commission, swap, and notes/reason.
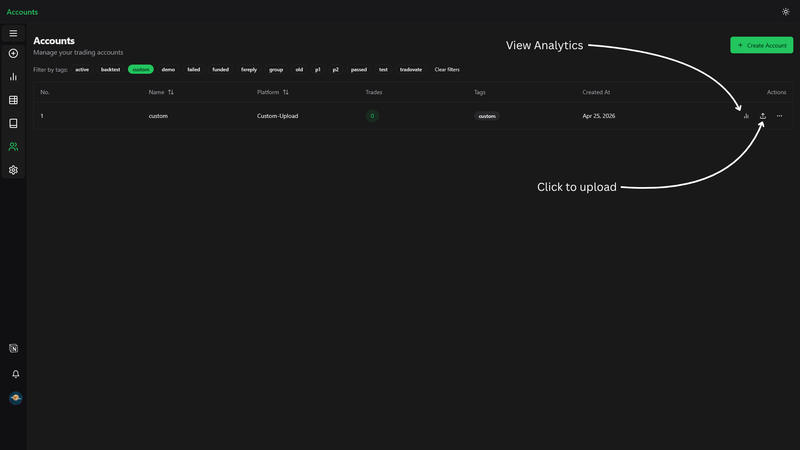
Step 1: Create or Select a Custom Upload Account #
Go to Upload → Accounts and create an account using the Custom Upload platform.
Use a clear account name, such as the broker, prop firm, or strategy name. This helps you keep custom uploads separate from platform-specific imports.

Step 2: Upload Your CSV or XLSX File #
Click the upload button on Custom Upload account or open the Add Trades modal, select your Custom Upload account, and upload your file.
Step 3: Map the required fields. #
Manually map the required columns or click Auto-map with AI to let AI do it for you.
The AI uses your column headers and a small sample of rows to suggest which file columns match FxJournalStats fields. You still review the result before anything is uploaded.
For privacy and control:
- Only the headers and a small row sample are used for the suggestion.
- You can change any dropdown before applying the mapping.
Step 4: Review the Preview #
After the suggested mapping appears, review the preview table.
Check that:
- Symbols look correct.
- Buy/sell values map to the right side/type field.
- Open and close dates are in the expected columns.
- Profit or P&L points to the final result column.
- Commission and swap are only mapped if your file has those columns.
If something looks wrong, update the dropdown manually before continuing.
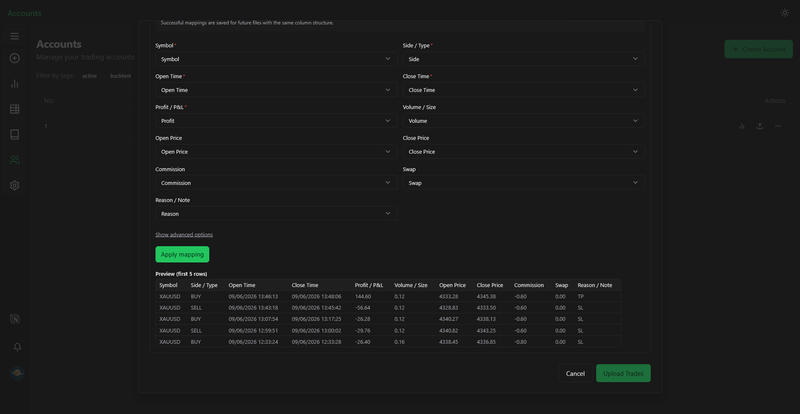
Step 5: Apply the Mapping #
Click Apply mapping.
FxJournalStats validates each row and shows how many trades are ready to upload. If there are issues, the panel lists the affected rows so you can adjust the mapping or fix the source file.
Common issues include:
- Missing required fields.
- Date formats that are not recognized.
- Profit values with unexpected symbols or separators.
- Summary/total rows mixed into the export.
If your file uses a specific date format or decimal separator, open Advanced options and set those values before applying the mapping again.
Step 6: Upload Trades #
Click the upload button on your Custom account or open the Add Trades modal, select your account and upload your file.
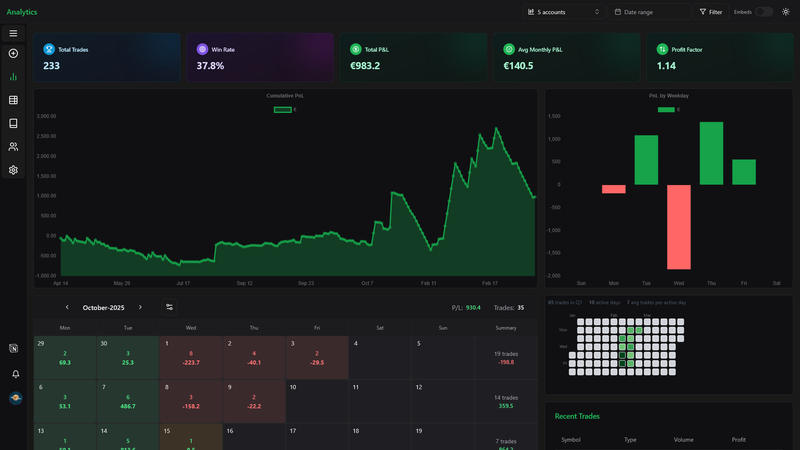
View Analytics #
After uploading, click the analytics button to view your export analytics.
Tips for Better Results #
- Export closed trades, not open positions.
- Include a real header row with meaningful column names.
- Remove unrelated account summary rows if your export includes them.
- Prefer raw numeric P&L columns over formatted text when possible.
- Review the preview before uploading, especially the first time you use a new export format.